

Add a new device to the Lazurio tailnet
Your device joins your Organization’s network through the Tailscale app. It takes a few minutes:
- Pick your device below.
- Install Tailscale and enter your Organization’s address. On Windows and Mac your agent does this for you.
- Sign in with your Lazurio account.
- Message your Organization Admin and wait until they approve the device.
You need the address of your Organization’s login server. Your
Organization Admin gives it to you; it looks like
https://headscale.example.lazurio.io. Do not guess it: with a different
address you sign in to someone else’s network, or not at all. On Windows
and Mac your agent also needs your login, for example jannovak, to name
the computer by Lazurio’s rule; your Organization Admin sends it with the
address.
Each device is added and approved separately. If the device is already in your Organization’s network and you only cannot connect, follow Reach an Environment through Tailscale.
Windows
Let your agent do it (recommended)
If you work with an agent on this computer, such as Codex in the ChatGPT app or Claude Code, it does the whole setup for you. You only click Yes when Windows asks about the installation, and you sign in.
- Copy the prompt below, fill in the address and login from your Organization Admin and paste it into a new chat with your agent.
- The agent installs Tailscale. When Windows asks whether it may make changes, click Yes.
- The agent sends you a sign-in link. Click it.
- Sign in with your Lazurio account. You never type a password or code for the agent.
- Done. The computer is signed in to your Organization's network. Approving it is a separate step for your Organization Admin: tell them you added a new computer.
- Give the agent full access. Without it, the agent cannot reach Tailscale. In Codex, switch the permission below the message box to Full access. In Claude, let it run commands.
- Copy the prompt below with the button at its top right and paste it into a new chat.
- Replace
<ADDRESS>with the login server address and<LOGIN>with your login, both from your Organization Admin’s message, and send the prompt. - Do what the agent asks you to: click Yes for the installation and sign in with your Lazurio account on the page it sends you.
Connect this Windows computer to my Organization's tailnet in Lazurio through Tailscale.The Organization's login server address: <ADDRESS>My login: <LOGIN>
The procedure and details are at https://documentation.lazurio.ai/en/guide/tailscale-add-device/#windows (the collapsible section "Details for the agent"). Follow it whenever you are unsure. Talk to me in plain language; I am not a programmer.
First: if you cannot run commands on this computer or have no internet access (you run in a sandbox), do not try anything and only tell me: "Below the message box, switch the permission to Full access and message me again."
What you do yourself:1. Check that C:\Program Files\Tailscale\tailscale.exe exists. If not, install Tailscale, only from an official source (the winget package Tailscale.Tailscale from the publisher Tailscale Inc., or https://tailscale.com/download/windows): winget install --id Tailscale.Tailscale --exact --accept-package-agreements --accept-source-agreements. Tell me beforehand to click "Yes" when Windows asks whether the app may make changes. If winget is missing or the installation fails, send me the link https://tailscale.com/download/windows and wait until I have installed it.2. Choose the computer's name in the network: <LOGIN>-<device>, only lowercase letters, digits and hyphens, where <device> is a short, stable label such as windows or thinkpad. If Tailscale on this computer already uses such a name in another network, keep its label. Do not change the computer's name in Windows. Without administrator rights, start the sign-in with that name in the background; it waits until it is finished (<NAME> is the name you chose):   Start-Process -FilePath "C:\Program Files\Tailscale\tailscale.exe" -ArgumentList 'login','--login-server=<ADDRESS>','--hostname=<NAME>' -WindowStyle Hidden   If you do not get a sign-in link within a minute, or the command ends before I have signed in, start it again the same way.3. Read & "C:\Program Files\Tailscale\tailscale.exe" status --json repeatedly until the AuthURL field contains a sign-in link. Before you give me the link, parse it as a URL and check that its scheme (https), hostname and port match the login server address above. Matching text at the start is not enough. If they differ, do not give me the link; tell me what does not match and stop.
Where you stop and leave it to me:4. Send me that link as a clickable link and tell me in one sentence: open it and sign in with your Lazurio account; when you see a green check mark with "Node registered" or "Node reauthenticated", close the tab and come back here. Do not open, fill in or confirm the sign-in yourself. Never ask me for a password or a verification code.
How you know it is done:5. Check three things: status --json shows BackendState "Running", & "C:\Program Files\Tailscale\tailscale.exe" debug prefs shows ControlURL equal to the address above, and the first part of Self.DNSName in status --json is exactly the name you chose. Only when all three hold, tell me: "Done. This computer is signed in to your Organization's network as <NAME>. Approving it is a separate step for your Organization Admin; without approval, Lazurio may not open from it. Tell your Organization Admin that you added a Windows computer named <NAME>."6. If any of the three checks still fails after a minute, rename nothing, change nothing, delete nothing and do not sign in again. Whether a computer may be renamed depends on whether my Organization Admin has approved it, and you cannot find that out from this computer. Stop and tell me the name you chose, Self.DNSName, ControlURL and BackendState, and ask me to send exactly that to my Organization Admin.
Rules: never send me to the Log in button in the Tailscale app; it leads somewhere other than the Organization's network. Do not log out or reset anything (no tailscale logout, down or --reset). If Tailscale already has another network, leave it: the sign-in adds the Organization's network as another account and switches to it; switching back is in the Tailscale menu. Do not use an auth key, do not change the registry or Tailscale policies, do not turn Tailscale off and do not try to approve the device. If something fails, tell me simply what happened and stop.
The agent cannot approve the device; your Organization Admin does that (see What happens next).
Manually, without an agent
The Tailscale app for Windows cannot take your Organization’s address in its window, so you enter it with one line in Windows PowerShell.
-
Install Tailscale for Windows. Do not sign in in the Tailscale app: its Log in button leads somewhere other than your Organization.
-
Click Start, type PowerShell and open Windows PowerShell with a normal click.
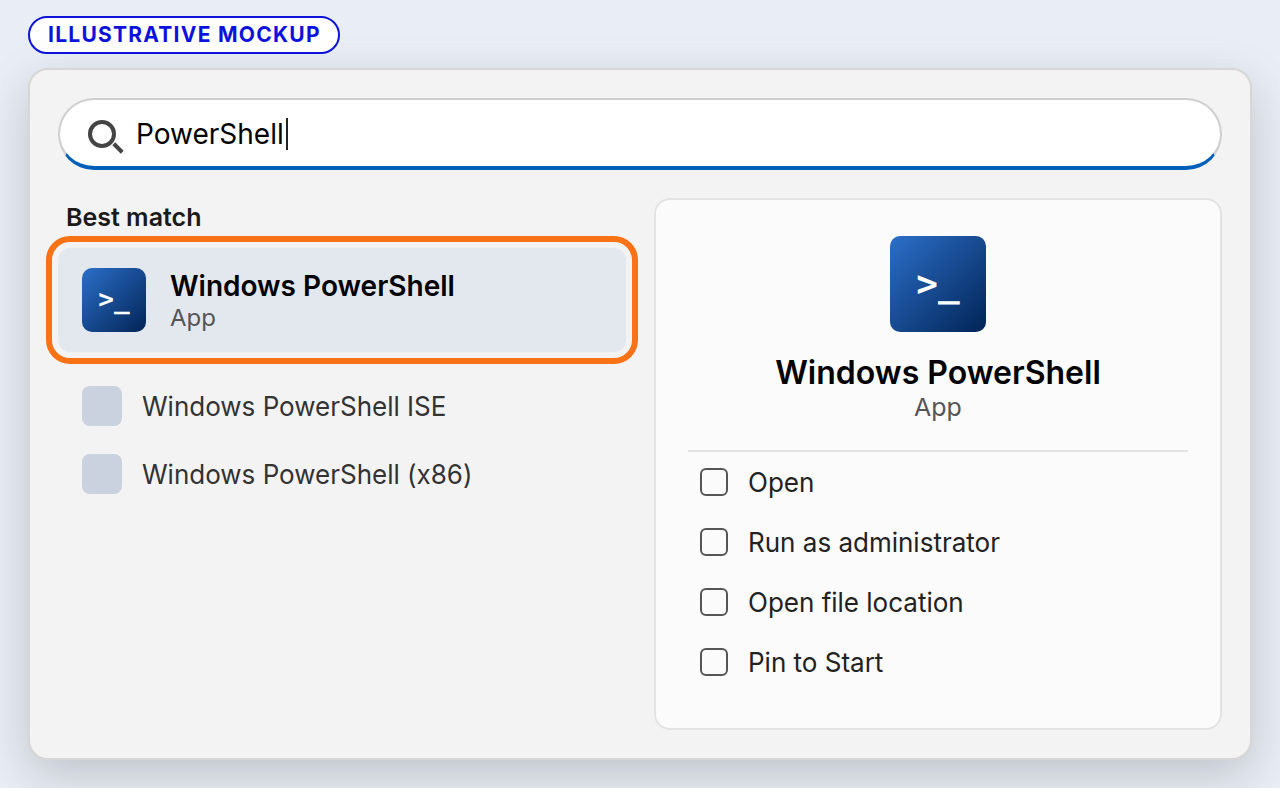
Illustrative mockup, not a screenshot. -
Copy this line, replace
<ADDRESS>with your Organization’s address, paste it into the window (Ctrl+V) and press Enter:Terminal window & "C:\Program Files\Tailscale\tailscale.exe" login --login-server=<ADDRESS>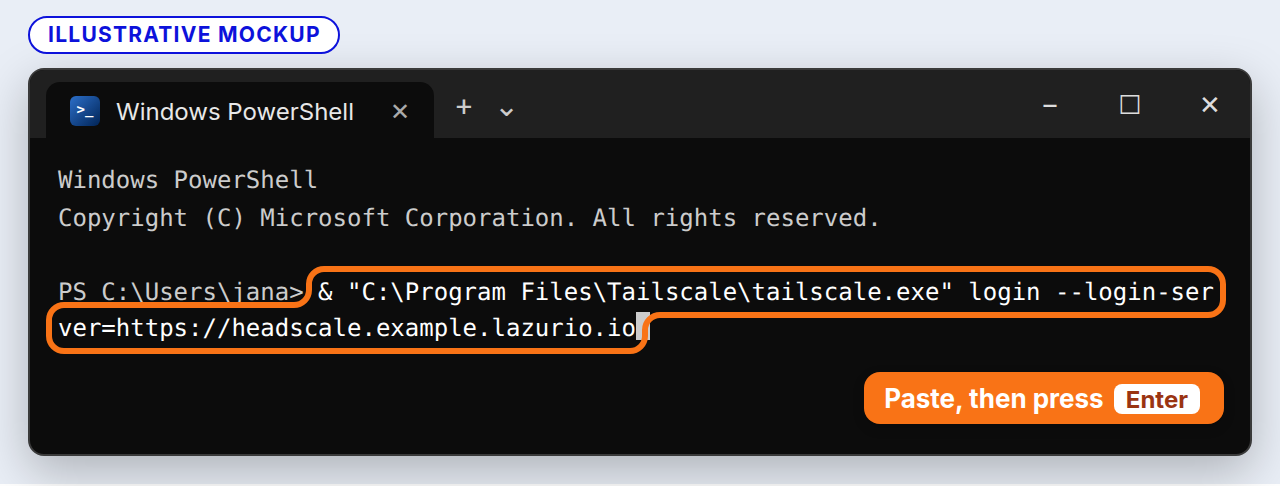
Illustrative mockup with the example address. The line may wrap; that is fine. -
The window shows To authenticate, visit: and a link. Hold Ctrl and click it.
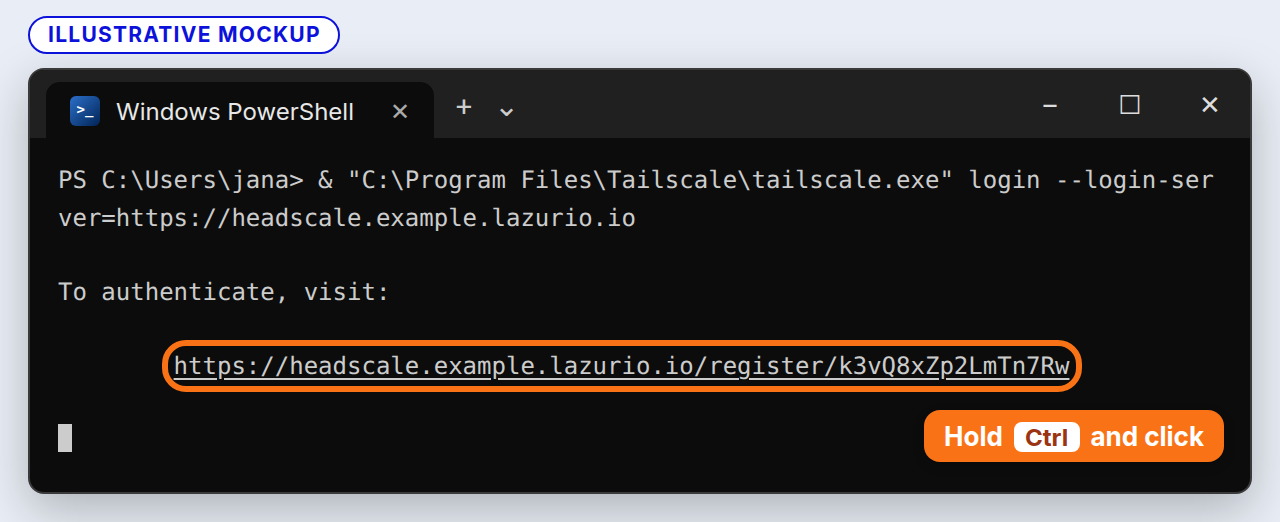
Illustrative mockup. Your link is different every time. -
Sign in with your Lazurio account in the browser. The browser shows a green check mark and Node registered. Keep the PowerShell window open until it shows Success. Then you can close it.
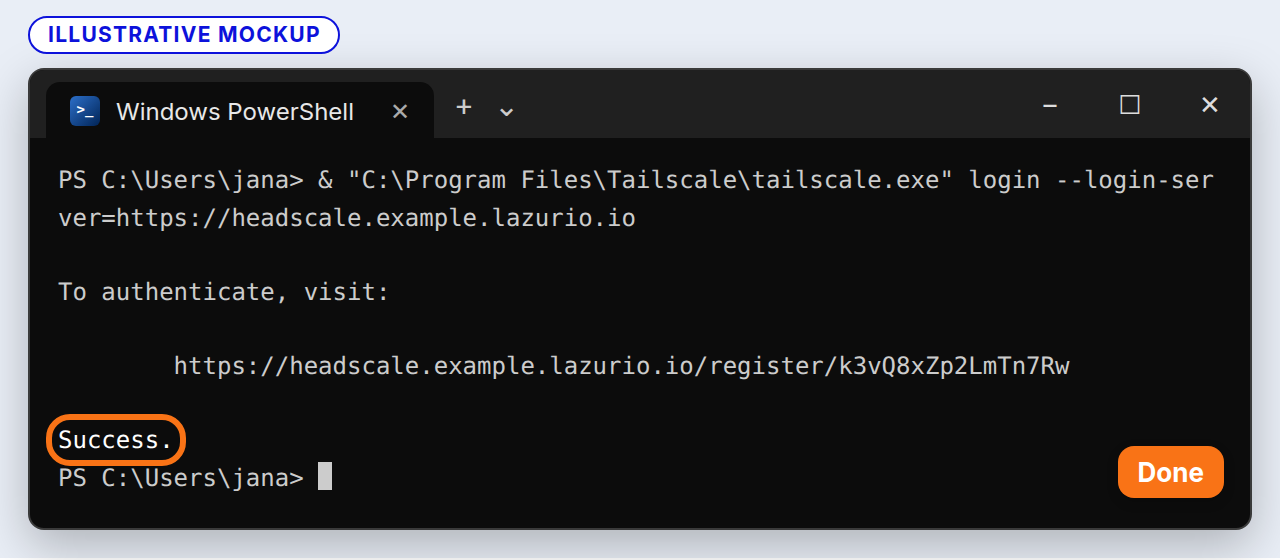
Illustrative mockup. Success. means the sign-in is finished, not the approval.
If something does not work
- PowerShell answers in red that the term is not recognized. Tailscale is not installed in its usual folder. Install it and paste the line again.
- The window only repeats the quoted path. The
&at the start of the line is missing. Without it, PowerShell only prints the path. - Nothing opens when you click the link. Select the whole link with the mouse, copy it with a right click and paste it into the browser. Do not press Ctrl+C in the window: with no text selected it stops the sign-in.
- You do not need Run as administrator.
Details for the agent
This part is for an agent doing the setup for a person. The person is not a programmer: talk to them in plain language and do not show them commands.
- Tailscale for Windows cannot take a custom login server in its window
(Tailscale documentation), so it is entered through the CLI with
tailscale.exe login --login-server=<ADDRESS>. The flag is exactly--login-server. - Installing with winget (
Tailscale.Tailscale) triggers a User Account Control prompt. The person clicks Yes; you never confirm it. tailscale loginwaits until the person has signed in. Start it in the background and read the sign-in link fromtailscale status --json(theAuthURLfield whileBackendStateisNeedsLogin). The same CLI printsTo authenticate, visit:and, when finished,Success..- Before you pass the sign-in link on, parse it as a URL and compare its
scheme, hostname and port with the login server address. A matching start
of the text is not enough:
https://server.example.evil.test/starts likehttps://server.examplebut leads elsewhere. On a mismatch, do not pass the link on and stop. - It is done when
BackendStateisRunningandtailscale debug prefsshowsControlURLequal to the address given. That means the device is in the tailnet, not that it is approved. - If Tailscale on the computer already has another account,
loginadds a new profile and switches to it. Do not delete or log out the old profile; the person can switch back in the Tailscale menu. - Name the computer
<login>-<device>with--hostnameat its first sign-in, as Lazurio’s agent manual says.<login>is the person’s login that their Organization Admin sent; never derive it from the Windows account or an e-mail address.<device>is a short, stable label in lowercase letters, digits and hyphens. Do not change the computer’s name in Windows. Report success only afterBackendStateisRunning,ControlURLis the given address andSelf.DNSNamehas exactly the chosen name, and say only what you verified: registration is not approval. Never rename the device afterwards. Lazurio’s agent manual allowstailscale set --hostname=<name>only on a newly registered device that is not approved yet, and whether it is approved cannot be read on the device: neither the Node registered heading nor the person’s word establishes that the Organization Admin has not approved it. If any check fails (another network, a state other thanRunning, another name or a-1suffix), change nothing, delete nothing, do not sign in again and hand the case to the Organization Admin with the exact state: the chosen name,Self.DNSName,ControlURLandBackendState. Tell the person the final name so they can pass it to the Organization Admin. - On failure, stop and tell the person what happened. Do not try auth keys, registry changes, Tailscale policies or approving the device.
macOS
Let your agent do it (recommended)
It works the same as on Windows: give the agent full access (in Codex,
Full access below the message box), copy the prompt, replace
<ADDRESS> with your Organization’s address and <LOGIN> with your login,
and do what the agent asks.
The agent asks you to allow the VPN configuration and, for the version from
Tailscale’s website (Standalone), also to turn on Tailscale’s network
extension in System Settings (the same steps are in manual step 2 below).
- Copy the prompt below, fill in the address and login from your Organization Admin and paste it into a new chat with your agent.
- The agent starts Tailscale. Click Allow when asked about the VPN; for the version from Tailscale's website, also turn on the network extension in System Settings.
- The agent sends you a sign-in link. Click it.
- Sign in with your Lazurio account. You never type a password or code for the agent.
- Done. The Mac is signed in to your Organization's network. Approving it is a separate step for your Organization Admin: tell them you added a new Mac.
Connect this Mac to my Organization's tailnet in Lazurio through Tailscale.The Organization's login server address: <ADDRESS>My login: <LOGIN>
The procedure and details are at https://documentation.lazurio.ai/en/guide/tailscale-add-device/#macos (the collapsible section "Details for the agent"). Follow it whenever you are unsure. Talk to me in plain language; I am not a programmer.
First: if you cannot run commands on this computer or have no internet access (you run in a sandbox), do not try anything and only tell me: "Below the message box, switch the permission to Full access and message me again."
What you do yourself:1. Check that /Applications/Tailscale.app exists. If not, open https://tailscale.com/download/mac for me and tell me to download and install the Standalone version. Wait until I have done it.2. Find out which version I have: defaults read /Applications/Tailscale.app/Contents/Info.plist CFBundleIdentifier. io.tailscale.ipn.macsys is the Standalone version from Tailscale's website, io.tailscale.ipn.macos the Mac App Store version. Start the app (open -a Tailscale) and tell me to go through the app's welcome steps without signing in. Only for the Standalone version, ask me to turn on Tailscale Network Extension in System Settings → General → Login Items & Extensions → Network Extensions (on macOS 14 and earlier, click Allow for Tailscale in Privacy & Security); skip this step for the Mac App Store version. For both versions, tell me to click "Allow" when asked about a VPN configuration. Wait until I have done it. Do not sign in in the app.3. Choose the Mac's name in the network: <LOGIN>-<device>, only lowercase letters, digits and hyphens, where <device> is a short, stable label such as macbook or macbook-air. If Tailscale on this Mac already uses such a name in another network, keep its label. Do not change the Mac's computer name. Start the sign-in with that name in the background; it waits until it is finished (<NAME> is the name you chose):   /Applications/Tailscale.app/Contents/MacOS/Tailscale login --login-server=<ADDRESS> --hostname=<NAME>4. Read /Applications/Tailscale.app/Contents/MacOS/Tailscale status --json repeatedly until the AuthURL field contains a sign-in link. Before you give me the link, parse it as a URL and check that its scheme (https), hostname and port match the login server address above. Matching text at the start is not enough. If they differ, do not give me the link; tell me what does not match and stop.
Where you stop and leave it to me:5. Send me that link as a clickable link and tell me in one sentence: open it and sign in with your Lazurio account; when you see a green check mark with "Node registered" or "Node reauthenticated", close the tab and come back here. Do not open, fill in or confirm the sign-in yourself. Never ask me for a password or a verification code.
How you know it is done:6. Check three things: status --json shows BackendState "Running", debug prefs shows ControlURL equal to the address above, and the first part of Self.DNSName in status --json is exactly the name you chose. Only when all three hold, tell me: "Done. This Mac is signed in to your Organization's network as <NAME>. Approving it is a separate step for your Organization Admin; without approval, Lazurio may not open from it. Tell your Organization Admin that you added a Mac named <NAME>."7. If any of the three checks still fails after a minute, rename nothing, change nothing, delete nothing and do not sign in again. Whether a Mac may be renamed depends on whether my Organization Admin has approved it, and you cannot find that out from this Mac. Stop and tell me the name you chose, Self.DNSName, ControlURL and BackendState, and ask me to send exactly that to my Organization Admin.
Rules: never send me to the Log in button in the Tailscale app; it leads somewhere other than the Organization's network. Do not log out or reset anything (no tailscale logout, down or --reset). If Tailscale already has another network, leave it: the sign-in adds the Organization's network as another account and switches to it. Do not use an auth key, do not install anything with sudo, do not turn Tailscale off and do not try to approve the device. If something fails, tell me simply what happened and stop.
Manually, without an agent
- Install the Standalone version from Tailscale’s website and start it. Go through the welcome steps, but do not click Log in.
- Allow two things without which the Standalone version does not work on a
Mac:
- Network extension: open System Settings → General → Login Items & Extensions, select the ⓘ icon next to Network Extensions, turn on Tailscale Network Extension, confirm with your password or Touch ID and select Done. On macOS 14 and earlier, instead click Allow next to the Tailscale message in Privacy & Security.
- VPN configuration: when the Mac asks whether it may add a VPN configuration, click Allow.
- Hold the Option (⌥) key and click the Tailscale icon in the menu bar. Point to Debug and, under Custom Login Server, choose Add Account….
- Enter your Organization’s address and click Add Account.
- Sign in with your Lazurio account in the browser. You see a green check mark and Node registered; then close the tab.
Details and other ways
- Tailscale for macOS needs macOS Ventura 13.0 or later. Tailscale recommends the Standalone version.
- If you are already signed in to another tailnet in Tailscale, there is a second way: Tailscale icon in the menu bar → Settings → Accounts tab → arrow at the bottom left → enter the address → Add account.
- Both permissions are described in Tailscale’s documentation.
- The Mac App Store version does not need the network extension in System Settings; allowing the VPN configuration is enough.
- Steps 3 and 4 follow the Headscale documentation; we do not have our own pictures from a Mac yet.
- For the agent: the CLI is inside the app bundle at
/Applications/Tailscale.app/Contents/MacOS/Tailscale(Tailscale CLI documentation). It works only while the app is running and the VPN configuration is allowed; for the Standalone version (CFBundleIdentifierio.tailscale.ipn.macsys) the network extension must be allowed too, the Mac App Store version (io.tailscale.ipn.macos) has none in System Settings. The sign-in link, the done check, other accounts and the device name follow the same rules as in Details for the agent on Windows.
iPhone and iPad
- Install Tailscale from the App Store.
- Open it, choose Get Started and allow the VPN configuration. Do not sign in yet.
- Tap the profile icon at the top right, then Log in (or your account, if you already have one). On the screen that opens, do not choose any account.
- Open the menu at the top right and choose Use a custom coordination server.
- Enter your Organization’s address, tap Log in and sign in with your Lazurio account. You see a green check mark and Node registered.
Details
- Tailscale works on iOS 16 and later.
- The app changes its menus between versions. If you cannot find an item, look for a similar menu for a custom server.
- We do not have our own pictures from an iPhone yet. The procedure with screen descriptions is on Tailscale’s page Configure Tailscale clients to use a custom coordination server.
Android
-
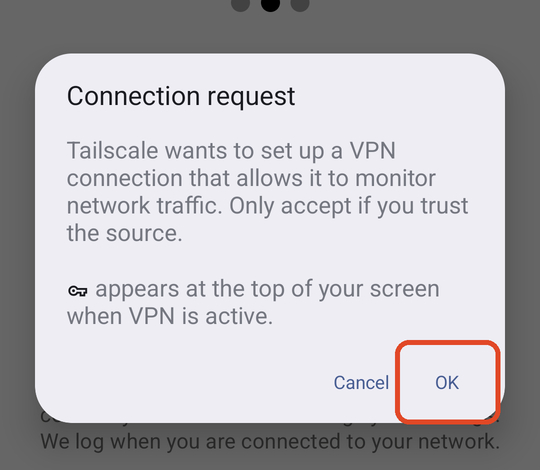
Install Tailscale from Google Play and open it. When asked about the VPN connection, tap OK.
-
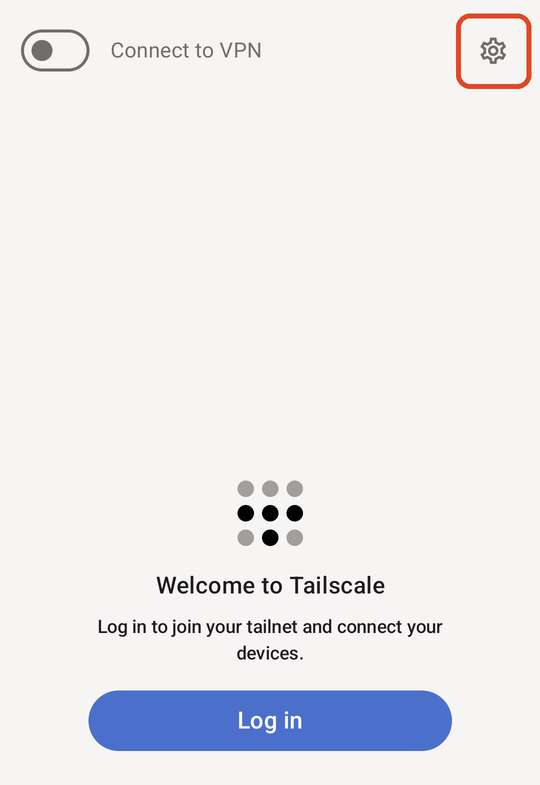
Do not tap the large Log in button. Tap the gear at the top right.
-
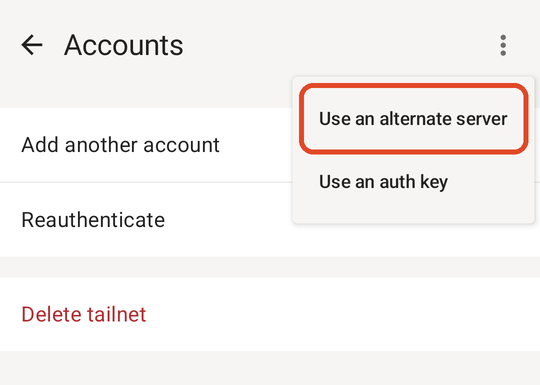
Tap Accounts, then the three dots at the top right, and choose Use an alternate server.
-
Enter your Organization’s address, tap Add account and sign in with your Lazurio account. You see a green check mark and Node registered.
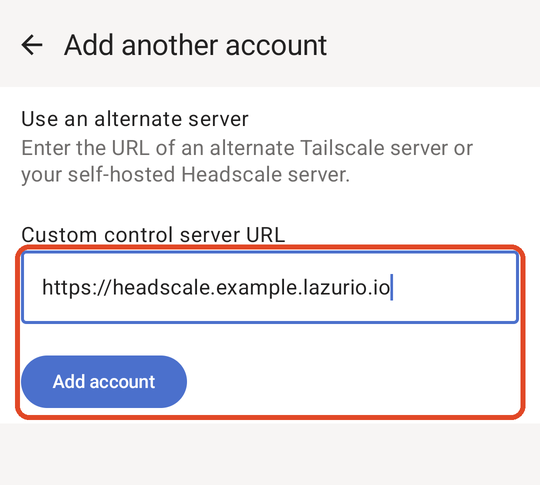
The picture shows an example address. Enter your Organization’s address.
Details
- Tailscale works on Android 8.0 and later. We walked through the steps in the real Tailscale 1.104.5 app on 3 November 2026, and the pictures come from it.
- The large Log in button leads to Tailscale’s own server, not to your Organization.
- The app changes its menus between versions. If you cannot find an item, look for a similar menu for an alternate server.
What happens next
When the sign-in works, the browser shows a page with a green check mark and the heading Node registered, followed by “Registered as” with your account and “You can now close this window.” Close the tab. If you added this device before, the heading reads Node reauthenticated; that is fine too.
Now the device is in your Organization’s network. A new device waits for approval by your Organization Admin. Tell them that you added a new device, what kind (for example a Windows computer) and when. Use a channel they recognize you by: they approve the device only when they know the request comes from you.
Once they approve it, they let you know and the addresses of the Environments you have access to open (with Tailscale turned on and your Organization’s network selected, see Reach an Environment through Tailscale). Until then, do not expect the Organization’s Environments to open from the new device, even if Tailscale shows a connection. Whether a device that is not yet approved is blocked is decided by your Organization’s network rules (see the Admin section below).
If nothing happens
- The sign-in ended with an error. Your Lazurio account may not join this Organization’s tailnet yet, or you entered a different address. Check the address and message your Organization Admin.
- The Organization’s tailnet is missing from the account list in Tailscale. The sign-in did not finish. Go through the steps again from entering the address.
- The device keeps waiting. Your Organization Admin may not know about it. Message them.
- The device appeared in the network under another name, for example with
a
-1suffix. Do not delete anything or sign in again; tell your Organization Admin, who sorts it out with the network operator.
For the Organization Admin: approval and device names
Every device is approved by an Organization Admin. An approval is a relation between a specific device, its owner’s account and your Organization; on a tailnet that serves several Organizations, each Organization approves separately. Approval for one Organization does not open another. This guide does not promise that a device that is not yet approved is blocked: that is decided by the Organization’s network rules, which the Organization Admin manages with the network operator.
How it works today (as of 17 November 2026). The Organization Admin approves a specific device and the Environments it may reach in the network operator’s managed procedure; the network operator runs the server the tailnet is on. The change goes through review and deployment, and only then does the device reach the new places, so approval can take longer than a few minutes. The Organization overview does not show waiting devices yet: agree directly with the person which device is theirs, and ask the network operator how to submit the approval.
Target. Lazurio’s access model (decision 0245) describes a registered
device that reaches nothing until the Organization Admin approves it in the
Organization overview; a service on the Conglomerate Host applies the
approval within tens of seconds. A person can remove their own lost device
immediately. In GEN3 an approval is recorded as an audit entry in the
Organization’s configuration. For GEN4 it is decided that the service’s own
audit entry is the only record of an approval, Lazurio Auth keeps a copy of it
for overviews and applications, and the GEN3 entry in the configuration does
not carry over (decision 0245 as amended on 17 November 2026). That is still
being built (issue-2026-11-03-002). This guide does not claim that it
already runs for your Organization.
Device name. Lazurio’s rule for a device’s name in the network is
<login>-<device>, for example jannovak-macbook:
<login>is the owner’s login in lowercase; for an account linked to GitHub their GitHub login, otherwise the label of their Headscale user.<device>is a short, stable label (iphone,pixel,macbook,windows); two devices of the same kind are told apart permanently, for examplemacbook-airandmacbook-pro.- Only lowercase letters, digits and hyphens, without the Organization name. The name is only a description and grants no access.
On Windows and Mac the person’s agent sets the name on the computer at its
first sign-in, before approval, as Lazurio’s agent manual says; send the
person their login together with the address. A phone, and a computer set up
without an agent, keeps the name Tailscale takes from the system, usually the
computer’s name or the phone’s maker or model: the person cannot change it by
clicking in the app (the Android app 1.104.5 has no such setting and
Tailscale’s documentation lists none for the other systems either), so it
stays until a clickable way exists (issue-2026-11-03-001). The name is
never changed by hand on the server. A -1 suffix or another name than expected is
not success: check with the network operator whether another device has that
name or was renamed earlier, and do not delete another device. Do not rename
a device that is already approved because of the rule: the name is part of
its approval.
Before approving, check that the owner asks for the device through a channel you trust, that the device in the tailnet belongs to that person’s account and that it is a fresh registration they really made. Do not approve an unknown device.
On Windows the login server is entered with one line in PowerShell, or the
person’s agent does it (see Windows). A clickable way for
Windows is still missing (issue-2026-11-03-003). Have a lost or unused
device removed the same way its approval came about. The rules for who may
approve and what an approved device reaches change through a reviewed change
to the Organization’s configuration, not through approving one device.